Like many of you I have frequently used rivers in my wargames but they have invariably been quite small and represented with rather crude strips of vinyl, plastic or even painted card. Recently I decided to change all this and up the ante by making a really large impressive river! What I had in mind was something which would grace my jungle terrain and do justice to the 28mm armies that I had made for my Ten Years War in Cuba project. I was also intrigued by the idea that something made for 28mm models could later be used for smaller scales such as 20mm or 15mm and would then give a really spectacular feel to the terrain.
I had various pieces of thin mdf and fibre board lying around in the garage and I decided to take a selection of lengths and cut them to a standard 16 inch width. Once that was done I marked out the course of the river leaving roughly 3 inches on bank on each side and a strip of water down the centre which would then be 10 inches wide. I also wanted a curved section and I marked out the board being careful to keep the strip of water 10 inches wide to match up with the other boards:

With the boards marked up I began the job of painting them. I used acrylic paint (great big tubes from one of the cheap shops!) and applied a thick coat of dark green:

Once the chosen area was covered I blended in streaks of blue and even a little brown in the centre of the river where the colour is naturally darker:

When the boards were completely dry I began the job of adding grass to the river banks. I decided to use Gaguemaster Scenic Mat opting for the GM20 shade of spring green since this most closely matched the rest of my jungle scenery. The mats are available from model railway suppliers and come in several different shades, a roll of 75 x 100 Cm typically costing about £8.00. (If you can't obtain this stuff or prefer other options you can of course use pva glue and flock or even pva glue and sand which can then be painted.)
I cut the mat into strips making the actual riverbank a little irregular and then glued the pieces into place with pva being careful to maintain my 10 inch strip of water down the centre.

I also cut the pieces with an extra inch and a half or so around the edges so that I could fold them round the edge of the board to give a neat finish; I did this by cutting the corner at an angle just like you did when you backed your school exercise books with wallpaper (guess I am giving my age away now!)

Finally I used gaffer tape to tidy up the edges and keep the mat firmly in place:

Once the pva was dry I could begin work on adding a little detail. I ran a thick streak of pva down each bank and then sprinkled sand into the wet glue

At one or two points I added large blobs of glue and placed into it a few pebbles or pieces of fine grit to add a bit of interest:

Once the glue was dry - I left it for 24 hours - I was able to shake off the excess sand and grit and begin varnishing. I applied a thick coat of gloss varnish over the area representing water and I also ran it over the sand and pebbles. As soon as the varnish is applied the rather dull colour of the paintwork springs into life and the whole thing begins to look much better:

I applied three coats of varnish in total to give a deep gloss finish and I highlighted a few spots with brilliant white paint to represent waves and foam.

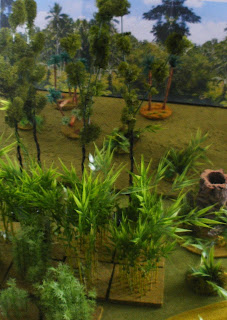
As you can see in this view I made one section which contained a ford made from sand, grit and pebbles glued in place with pva and also heavily varnished. This section was livened up with a couple of twigs to represent driftwood and the area was also highlighted with white paint:

When everything was properly dry I took a few pictures with my Cuban cavalry charging across the ford so that you can see how the finished article looks:


Overall I am really pleased with the result and think that it was well worth the effort. I am off now to consign all my old bits of vinyl and card river sections to the bin!